Dead Island Collectibles guide
Use our maps to find more IDs, excerpts, and tapes than you can shake a severed fist at
Jungle

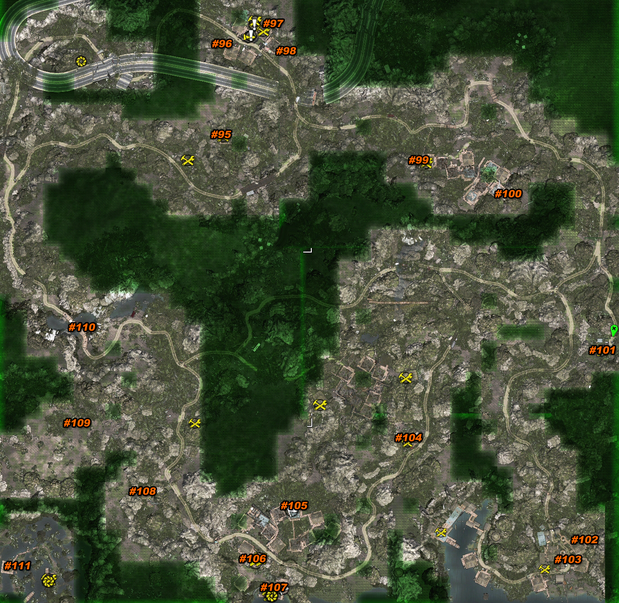
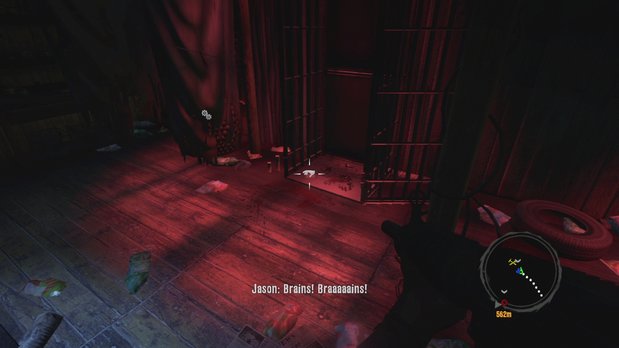
#95 (ID Card #69) Inside the cage in Jason’s house. Be careful on your approach through, as Jason is a serious threat. He moves quickly and can kill you with a single swipe of his machete. Your best bet is to run past him and up the ladder into this house. Nab the ID Card and the chainsaw, then use the chainsaw to make quick work of Jason.

#96 (ID Card #61) When you enter this village, go to the last house on the left and check the coffee table.
#97 (ID Card #73) In order to get into this warehouse and grab the card from a shelf inside, you need to complete the “Visit the Pub” quest initiated by the man standing in front of the locked warehouse.
#98 (ID Card #72) Inside the building where you find the mechanic/thug for the “Visit the Pub” quest. It’s on the bar.
#99 (ID Card #70) Inside this hut on a small stool. You’ll have to climb onto the roof of the adjacent hut to gain access.
#100 (ID Card #71) The only way to get into this hut is to walk across the plank bridge and drop in through the roof. The card is on a small table inside.
#101 (ID Card #64) Check the bulletin board in the control room.
#102 (Banoi Herald Excerpt #32) Check the first house on your left as you enter this village. It’s on the coffee table.
#103 (ID Card #65) Look inside the bus sitting in the middle of the village.
#104 (Banoi Herald Excerpt #31) Check the table near the workbench found at this location.
#105 (ID Card #68) Check the bed inside the hut occupied by Carter.
#106 (Tape #7) In the village’s main hut, on the desk.
#107 (ID Card #66) Check the eastern riverside hut. You’ll need to enter this hut for the “The Dead in Fishing Net” quest. The card is on a small table near the bed.
#108 (ID Card #62) Inside this bunker. Enter and climb the ladder to find the card on the ground near a backpack.
#109 (ID Card #67) As you are climbing through the passenger cabin of the crashed airliner, look for this ID on a seat at the edge of where the fuselage is split.
#110 (Banoi Herald Excerpt #30) Inside the tilted bus, near the steering wheel.
#111 (ID Card #63) You can’t access this area until the “King of the Swamp” main quest. The card is on a table in Mowen’s hut.
Lab

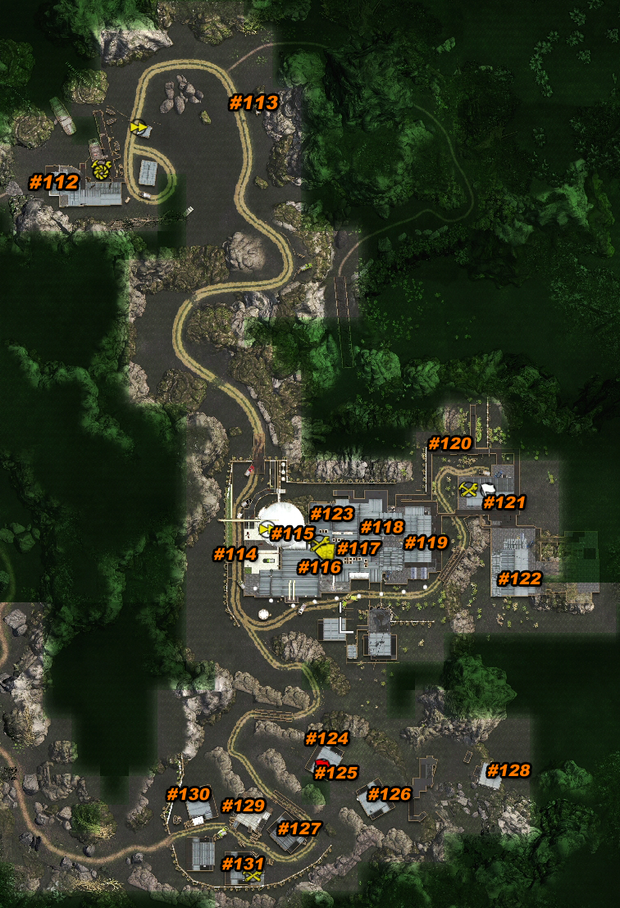
#112 (ID Card #82) As soon as you arrive at the Lab (which is actually just more jungle with a lab in it) enter this building and keep climbing stairs until you see this card on the ground in front of a door.
#113 (ID Card #85) Check the driver’s seat of this truck on the side of the road.
#114 (ID Card #84) In the lab’s driveway, just a few yards in front of the drivable vehicle. It’s right next to a corpse.
#115 (Banoi Herald Excerpt #40) Just before Will opens the door to let you into the lab, check the nearby coffee table.
#116 (Banoi Herald Excerpt # 37) There is a bathroom just past where Will is standing. Look on top the toilet tank (the left toilet).
#117 (Tape #9) Just before you enter Dr. West’s lab, look on the edge of Bob’s desk to find this tape.
#118 (Banoi Herald Excerpt #36) After speaking to West, speak to Bob and he’ll open up a door for you for the “Rats in the Lab” quest. Go through that door, and into the first room on your right. The excerpt is on a desk under the periodic table.
#119 (ID Card #76) Inside this warehouse on a computer desk. You can gain access to the warehouse by finding a stack of crates that allows you to hop over the fence.
#120 (ID Card #75) From the catwalk surrounding the warehouse mentioned above, go down the metal stairs and continue to this spot on the map. The ID is on the edge of the catwalk.
#121 (Tape #8) On a desk as soon as you enter this warehouse.
#122 (ID Card #83) To enter this warehouse you need to accept “Scran’s Not For the Dead” from Monroe in the lab. You’ll need to have accepted the main quest “Pure Blood” and have completed Monroe’s other quests first. The ID is on the floor in the corner of the warehouse.
#123 (ID Card #74) When you come back from the warrior’s base, the lab that was barricaded before will now be accessible. Check the desk near Monroe for the card.
#124 (ID Card #77) You gain access to this building during the “Rotten Flesh” mission, after you complete the “Man of Faith” main quest. Check the desk for this ID.
#125 (Banoi Herald Excerpt #34) At the foot of the bed in this building.
#126 (ID Card #78) Check the bathroom, next to the toilet.
#127 (Banoi Herald Excerpt #35) Inside Connor’s cabin on a small table. You can’t get in here until you accept the “Pure Blood” main quest.
#128 (ID Card #79) Climb to the roof of this building and drop inside. Check the bathroom.
#129 (ID Card #80) Climb on top of this building, break the skylight, and drop in. The ID is on a chair.
#130 (ID Card #81) Inside this building, on the counter next to the phone.
Sign up to the GamesRadar+ Newsletter
Weekly digests, tales from the communities you love, and more


