
 Join The Community


If you're looking for a full Madison walkthrough, you've come to the right place. We've forged ahead and solved every puzzle, survived every ghost encounter, and emerged from the Maxwell house with Luca's soul intact. It's not the easiest game to navigate, so we're here to help guide you through the various challenges Madison will hit you with.
Read on for our full Madison walkthrough and we'll help you reach… well, an ending of one sort or another.
Madison walkthrough and guide

We've broken our Madison walkthrough up into twelve sections that represent the main events of the game, in the order you encounter them, and you can navigate through these by means of the links on the side of the page - or just scroll down to encounter them in chronological order!

The important thing to remember is that as a game, Madison has an… elastic relationship with logic, arguably because of the distorting power of the demons and the implication that the reality as you perceive it is fairly questionable. Intuiting the next steps or what the game wants from you, as well as how you're supposed to go about it, can be a little tough at times. If you ever want to break away from the walkthrough and try to solve things on your own, focus first on making sure you know absolutely everything at your disposal, read through any notes and text, and then go about the process of seeing how it all ties together. What puzzles want from you can often be a little unclear if you don't have all the pieces yet, so exploration and situational awareness is key.
However, for those who do want some help, never fear! Well, fear quite a lot, there's horrible ghost demons, but at least you won't be stuck on how to find them. We'll also be focusing on the critical path, with less attention given to optional notes and collectibles.
Escaping the First Room

As the game starts, you'll begin trapped inside a locked bedroom with somebody hammering on the door. Your first objective is to escape, though not via the door itself.
- Pick up the Sunbox in front of the door.
- Walk up the steps to the right of the television.
- Here you can rotate the TV to illuminate sections of the room.
- Turn the TV so that it points at the couch and causes something underneath it to glint.
- Pick up the doorknob that's glinting and use it on the hatch next to the TV to open it.
- Take out the hammer inside and use it on the boards blocking the doorway to remove them.
- Squeeze through the crawlspace beyond until it collapses behind you. You should eventually emerge into a hallway.
The Camera and the Hallway

Now you're in the corridor, your objective is to find a way out of the house, but the only door is padlocked. You actually won't be escaping via that (or using the hammer to just break a window, which I would do), but instead by making your way further inside.
- Interact with the blank wall on the left for Luca to exclaim "Wasn't there a door here?!"
- Look down the hallway to see a shape covered by a blanket that wasn't there before. Go up to it and pull the blanket off.
- The door to the left of the crawlspace is now unlocked. Go inside and take the Oval Portrait off the right-hand wall.
- Pick up the present in the centre of the room and interact with it to get the Instant Camera.
- There's a locked hatch in the room - ignore it. You won't open that until much, much later.
- The door will be locked behind you all of a sudden. Take a photo of the lightbulb above your gift to turn it into a noose, and unlock the door again.
- The blanket shape is back in the corridor. Pull the blanket off it again.
- Interact with the space on the wall above the desk where a picture should obviously go.
- The blanket shape is back yet again! Uncover it one more time and pull the Nail out of its face.
- Use the nail on the portrait space, then hang the Oval Portrait you got from the gift room.
- Take a picture of the hung portrait with your camera. This will cause the door to appear behind you where it should've been in step one.
- Go back into the gift room to the broken gramophone. Beneath it is a drawer you can open - take out the Study Key and use that to unlock the newly appeared door.
The polaroid instant camera is the big new addition here - it's an integral part of your inventory and serves as an important way to gain information. Like with the lightbulb, it can alter certain key objects by photographing them, and the photographs it prints out can reveal additional information beyond what your eyes can see. As a rule, you should photograph anything surrounded by polaroid photos, or just anything that seems weird.
The House and the Basement

Once you step through the study door, just ahead of you will be a small room with a safe, where you can deposit items to make space in your inventory. As a rule, you always want at least once space available to pick up new things, otherwise you'll have to trek back to this room to make space again, as items can't be discarded or dropped.
- Pick up the matches next to the TV and interact with them to get a Key marked "J".
- Open the door across from you and go inside to see the red safe. Pick up the Tape labelled "#1" next to it.
- Use the J key to open the safe and take Luca's Notebook out of it. Examine it in your inventory to see the weird drawings. Store the Sunbox inside, you won't need it for a while.
- Photograph the ritual symbol on the wall that looks like a D20 die, just between the safe room door and the TV. If you've done it right, the room should shake.
- Go through the door to the right of the TV into the kitchen/dining room and the power will go out. Follow the red lights down the corridor and the stairs to the generator.
- Interact with the fuses on the wall. They can individually be set up or down, but getting the sequence wrong resets you. It's pure trial and error with a random result - just try them all until they stay in place, then prod the generator to get power back.
- Head through the door next to the fuses and pick up the Solar Medallion on the shelf in the corridor.
- Play Tape #1 on the tape player in the dining room. Luca will have some sort of vision of a red door after it's done. These visions are a recurring element in the game, in which Luca draws objects that represent the next key location or objective.
The Red Door and the Well puzzle

The Red Door is one you might've found already if you've been exploring, but until now it wouldn't open. This marks one of the first times that Madison will display a flexible attitude to logic and reality, though not the last.
- Go into the kitchen and open the drawer next to the oven to find a Triangular Key. Store it in the safe if you need the space, this item won't help for a while.
- Go back past the generator to where you found the Solar Medallion, and squeeze through the crawl space next to it. The Red Door is at the end - photograph it to unlock it.
- Through the Red Door is a well sealed by a stone cover and three padlocks. Using the Shovel nearby on the well will get you an achievement, but it serves no other function.
- The actual Well puzzle to open it is based on the padlocks that hold it in place. The padlocks' symbols match those displayed on the ritual you photographed earlier, just outside the safe. Look through your photographs in your inventory to see which three symbols are displayed prominently (the answers are random each time) and set the three padlocks to match.
- Once this is done, photograph the well and the stone cover will explode. Climb inside the well and down the ladder.
- Pick up the rusty Moonbox in the sewer below, resting against one of the stone supports. This'll block off your way out, and spawn in a Police Radio for you to listen to. Walk back under the light between the columns and you'll suddenly be surrounded by tape.
- Here you'll notice that the red light on the police radio starts flashing faster or slower depending on where you look in the darkness, like a proximity sensor. It's a very small space, but once you've homed in as much as you can, photograph that area of blackness to shake reality and get a bit of a radio play.
- Repeat the proximity sensor/photo puzzle a couple more times. You'll be teleported out of the area to a circle of red doors.
- Open all the doors, whereupon they will all slam shut and lock. Photograph the doors individually until one of them is blasted open, putting you back in the basement.
The Attic and the picture puzzle

Now you're back in the house, things are going to get a little more complicated. The goal of escaping has been put aside in favour of pursuing answers about your situation, though they'll be few and far between.
- Once out of the Red Doors, Luca will have a vision of the attic. You can now access it via the ladder in the hallway that links the kitchen and the TV room.
- Up here you need to complete the complex Madison picture puzzle. We've gone into more detail about it at the link, but we'll do a shortened version of it below.
- To complete the puzzle, you need to hang four portraits in the attic in the right places. The Square Portrait of Albert and Diamond Portrait of Giovinna are both up there already, though not in the right spaces.
- In the attic, you should also grab the Heart-Shaped Key that's attached to one of the wooden beams. Use it to unlock Grandma and Grandpa's bedroom, opposite the bathroom.
- In that room, open the cupboard and get the Old Slides for a slide projector. There's also an attached en suite with the puzzle for the Solar Medallions above the sink, where you have to place them in the right order to match the planets. There's another Solar Medallion in there already, and the one in your pocket you found in the basement. Place them both in there to save inventory space for now.
- The door in the TV room is now open. Head down the corridor and pick up Tape #2 lying on the floor, then quickly go back to the dining room and play it.
- Head back down the corridor, following the creepy Virgin Mary statue. At the end is a door leading to a movie room. Walk through it and past the red clock to Grandpa's office - the Circular Portrait is on the wall. Grab it.
- Back in the movie room, put the Old Slides in the projector. Every now and then you'll see a strange circular image displayed as they cycle through - photograph the image at that moment to freeze them and reveal the third Solar Medallion. Take it, and note the order of planets as displayed in the photo that's actually ejected by your camera.
- Head back to Grandma/Grandpa's room and arrange the Solar Medallions in the same order as the polaroid showed them. This'll unlock a new door in their bedroom covered by boards that you can remove with your hammer. Inside is the Hexagonal Portrait, the final picture needed.
- Head up to the attic and photograph the spaces where portraits can go to reveal hidden numbers. With those numbers in mind, place the pictures accordingly: 38 = Albert, 13 = Giovinna, 25 = Filomina, 10 = Pascual.
- With all four pictures up, look through the crack in the wall to see a door that opens before the wall itself collapses, allowing you to go through. Pick up the lighter on the left for a torch, then head inside.
The Graveyard and the underground tunnels

Inside is a network of tunnels that forms a maze - and frankly, it's a nightmare. You can't die in here, but there are jumpscares and there's also no clear explanation of where to go for a while. Here's our best advice:
- The maze you're in, from what we can tell, forms a rough circular pattern around a central point, and it's the centre you're trying to get to.
- As you get closer to the centre, you'll see an eerie figure at junctions who heads down certain tunnels. That's how you get out! Whenever you see that figure, follow them down that path.
- Eventually you'll reach a corridor filled with crosses. Head down it until you reach a graveyard filled with dead game designers.
- Follow the wooden path to the opposite side, where you'll find a stone tunnel going down labelled "St. Jupiter's Cathedral." Go down it to reach the next phase of the game.
The Church Mazes and Candles

This is another segment we've gone into more detail in the Madison church mazes page, but you can find what you need here too in an abridged version. Luca can travel between three eras of the Cathedral - 2022, 1987 and 1951 - by photographing the signs labelled as such, and needs to use this power to acquire four candles and set them up beneath the appropriate paintings while avoiding Hans the Nazi Ghost. Obviously.
- Pick up the Yellow Candle ahead of you when you enter the Cathedral, then head through the corridor to the Foundation Stone and photograph the sign reading "1987" to go back to the eighties.
- Read the plaque beneath the coffin in the main church room, then go down to the belltower and photograph the two paintings to learn what colours they're associated with: Angels = Green, Crucifixion = Red. Just past those paintings in front of the bell is a Red Candle you should grab.
- Head to 1951 and the Blue Candle will be on the bench under the sign. Grab it.
- Head to the belltower in 1951 and photograph the two paintings in the corridor there to discover two more associations: Virgin Mary = Blue, God = Yellow.
- Use the Pamphlet Maps scattered around and shown above to complete the Yellow, Blue and Red mazes in either 1951 and 1987 (they don't exist in 2022). Each maze has a random selection of paintings at the end, and you need to put the candle of that maze's colour beneath the associated painting and leave it there. So the red maze should have you leave a red candle beneath an image of the crucifixion.
- If the maze doesn't have the picture you need, complete it in the other era and it should be there. The randomised pictures means some trial and error may be required.
- After all this, go to 1951 and listen to the confessional. This will cause a ghost to start hunting you, but will also spawn the Green Candle in the central aisle of the church. Grab it and place it beneath the angel picture in the Green Maze before it's too late.
- Once all four candles are placed, head to the 1987 belltower and you'll find the Confessional Key beneath the bell itself.
- Go to 1951 and use the key to open the confessional booth. Inside is a plaque that reads Hans Goring: 1951. Pry the i out of it and place it in Madison Hale's plaque beneath the coffin in 1987.
- Photograph the coffin to cause it to explode, and pick up Madison's Skull. This'll cause a white door to appear just beyond - go through that to end up in a picture-lined corridor.
- Go back and forth between the two doors, unable to open them, until the ghost suddenly shows up. Immediately turn around and run in the opposite direction from him - the door ahead will finally open, and you'll escape back to the Maxwell house. Hooray…?
Setting up the Ritual and getting the crowbar

Things get a little confusing from this point on - Luca discovers that Madison Hale is trying to start a ritual to take over his body from beyond the grave, and is so shocked and horrified by this idea that he… carries on doing the ritual for her? Or perhaps Madison already has some control and is forcing him to do it, it's not clear. Either way, it's the only path to progress, so we might as well.
- There's now an answering machine message on the phone in the dining room. Listen to it, then head to the attached room in Grandma and Grandpa's bedroom where you put in the Solar Medallions. A loose board can be interacted with to get the Basement Key, though there's still something else there you can't get to.
- Head back down to the basement and use the key on the Red Door from before, but this time it leads to a basement storeroom. The lights will flicker, rearranging everything each time.
- Hitting the lightbulb will cause the room to rearrange again. Cycle through until you see a shelf with the Crowbar, which you need.
- Hit the light again to start getting jumped by the Virgin Mary statues. Find the one that's possessed by listening for breathing, then photograph that statue. Keep going until the door out finally reappears.
- Use the crowbar to pry up the loose board you got the basement key from, and you'll get the Wedding Ring. Luca will have another vision of an eye and a chair.
- Head back to the room where you got the camera - we'll call it the ritual room from now on - and there'll be four statues in a circle you can place objects on. Read the Ritual Book on the chair between them, and pick up another Triangular Key in front of that.
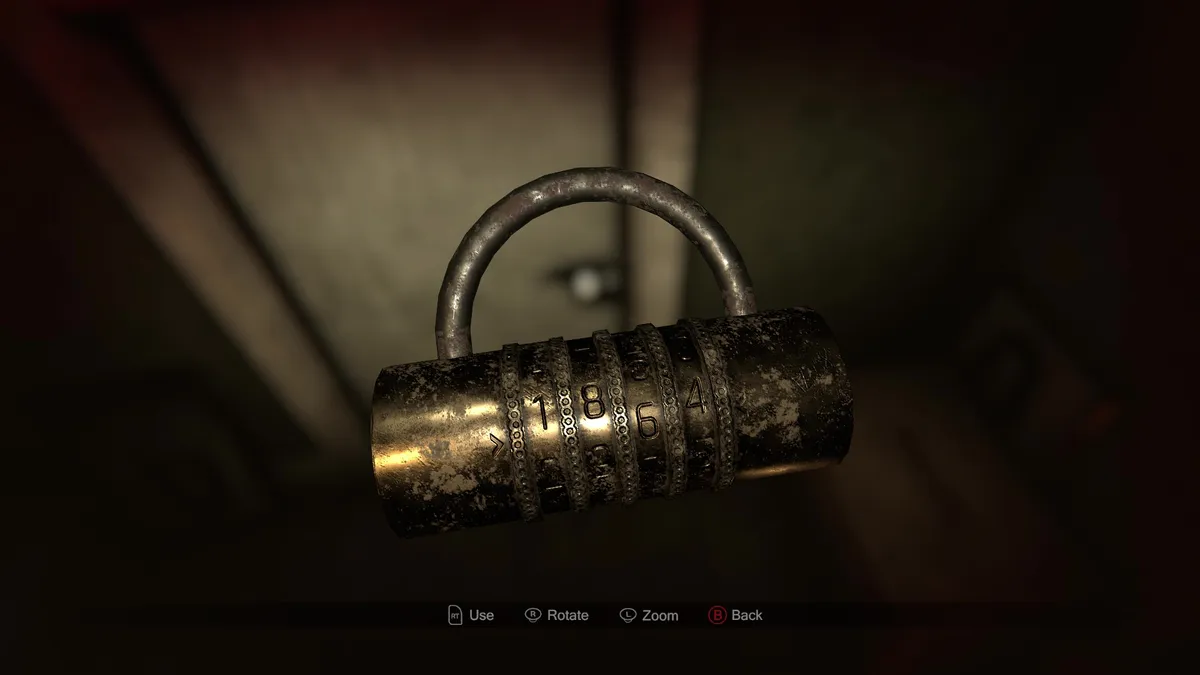
- Take both triangular keys to unlock the door in the corridor just outside, and head down to find a power saw and some Bolt Cutters, which you should steal. Repeat the fuse puzzle from earlier on the new fuses on the wall, and the power saw will turn on. Then put the rusted Moonbox in the saw to open it.
- Head back to the ritual room and place Madison's Skull, the Sunbox, the Moonbox and the Wedding Ring in the Statues' bowls. The statues' eyes will bleed and the lights will flicker if you've done it right.
- Look at the locked hatch that's been there since the beginning to get some new dialogue about it.
The Morgue and elevator puzzle

At this point the objective of the game is getting the Madison lock code so you can complete the ritual, which we've discussed a little more at the attached link. Of course, the guide below serves just as well if you want to keep reading.
- On leaving the ritual room, Tape #3 will have appeared on the windowsill opposite. Pick it up and play it in the Dining Room, and afterwards Luca will have a vision of Horns.
- Photograph the antlers in the TV Room. The picture you get will show a number - remember it! It's the first lock code number, and randomised from game to game, so we can't tell you what it is.
- Make sure you have the hammer for this next bit - Luca will have another vision of a red light. Turn off the generator in the basement and follow the corridor towards the slide projector room. This time however, a new door will lead you to an old morgue with an elevator and five floors you can navigate between.
- The goal here is to photograph the correct corpse on each of the first four floors, based on the radio chatter you're hearing. Some will require you to break walls with the hammer to see them properly, but here's the key: Robert Hale (Floor 1), Judith Hale (Floor 2), Drake Fletcher (Floor 3) and Lynn Jamie (Floor 4).
- Head up to the fifth floor and take a photo of the mirror to make it vanish and reveal the second lock code number (again, make sure you memorise it). There's also the Clock Key where the mirror was - grab that and head back to the main house.
The Clock Room Puzzle
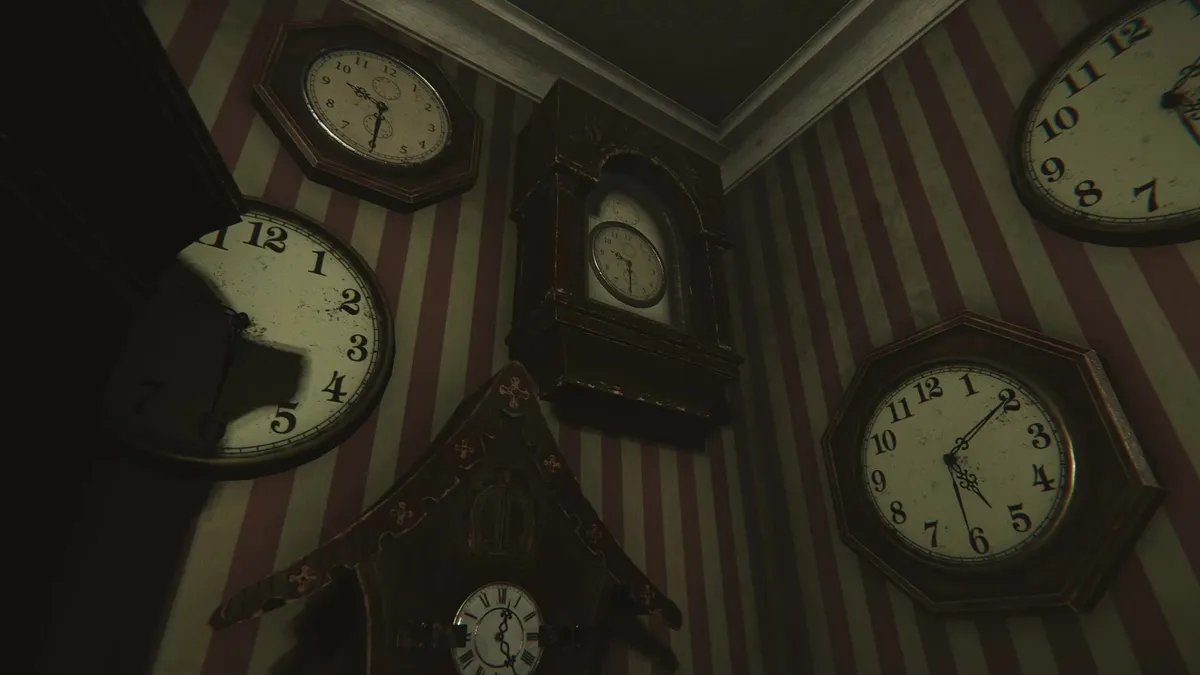
The next phase is all about setting clocks, which was Grandpa's shtick, and explains all the various clocks you've been seeing around the game so far that you couldn't interact with. This is their time to shine - pun most definitely intended.
- Head to the Clock Room next to the TV area and the antlers and use the Clock Key to unlock it. Inside are a lot of clocks, and Luca has a vision of another clock.
- Use the bolt cutters to open the locked desk in the clock room and get half of the safe combination. The other half is in the bathroom next to the sealed toilet.
- Go to the Green Safe in Grandpa's Office past the slide projector and use the combination: 9 Left, 11 Right, 5 Left to open it. Bear in mind that the numbers refer to segments, not times on a clockface, so turning 9 left from its starting position of "twelve o' clock" would actually turn it anti-clockwise to a three o' clock position.
- Inside, pick up the Clock Face. This is how we're going to solve the clock puzzle.
- You can find more detail on this in the Madison clock puzzle page, but each clock in the clock room that you can interact with needs to match all the ones around it. So if they all read 5:30 on one wall, the interactable one needs to read as 5:30 too.
- The necessary times are randomised, but the principle is the same: when you press a loose clock face into the clock, you can swap it with an existing one. You need to swap the four clocks in the clock room around with clock faces found in clocks around the house.
- Aside from the four in the clock room, there's clocks in these locations: Outside Grandpa's Office, in the Attic, in the Kitchen and outside the Ritual Room. Swap the faces around until you can make those in the clock room match all the ones around them.
- Once done right, take a photo of the door in the clock room to bust it open and get the third lock code number. In the room beyond is an Unfinished Clock hanging from the ceiling. Grab it.
Johnny's Room, the Red Safe and Blue Knees

Things are going to probably reach their creepiest point from here on out, as Luca will have to deal with the Madison Blue Knees demon, who we've elaborated on at the attached guide, including some lore on this horrible gremlin.
- After beating the previous puzzle, Luca has another drawing vision, presenting concentric circles with arrows and divots drawn on them.
- First though, head to the bathroom and use the bolt cutters to open the sealed toilet. Pick up the small concrete block inside (ew), and listen to the quick radio play that follows.
- Head to Grandpa's Office and use the drawing to deduce the code to the red safe. It's actually randomised from game to game, but use the red marks specifically to work out the combination (so for us using the image above it was 4 left, 8 right, 3 left, going from the outside in and including the red arrows as one mark).
- Inside is a Key to Johnny's Room, which you can use to open his room outside the slide projector room.
- There's a poem on the wall which hints at how to hang the weights in this room, as there's four hooks with animals on them, two of which already have concrete blocks hanging. Place the biggest weight on the shark, the middle weight on the snake, the smallest weight on the rat and hang the unfinished clock on the rabbit.
- Photograph the cage to reveal a children's book called Blue Knees. Interact with it and read to the end.
- Now finished, the room and house itself will have changed, with a hole nearby surrounded by candles.
- Blue Knees itself will appear and attack, and Luca can only stop it by photographing it in the instant before it strikes, driving the demon away temporarily.
- The house is now full of gramophones. Play one to the end (roughly 30 seconds) and it has a chance to dispense an Eyeball when you interact with it. If it doesn't, move onto the next gramophone. The ones that dispense eyeballs are randomly chosen.
- Once you have two Eyeballs, head back to the playroom and drop them in the hole. Then photograph the hole to get the fourth and final lock code number. A moment later an event will send you back to the normal house.
The lock code combination and ending
You're nearly there now, as the confrontation with Blue Knees is more of a final boss fight than anything else. The final stages are fairly simple, but we'll walk you through them just in case.
- Now with the full code, limp back to the Ritual Room and enter the code into the lock, using the numbers in the order that you received them. If you don't remember them, you should have them among the photos you acquired in your inventory.
- Open the hatch to reveal a small plinth with Elizabeth Maxwell's ashes on top. Interact with the ashes, then watch as Luca has one more vision and edits an existing drawing, knocking the ashes off the plinth in the process.
- Interact with the plinth and place your camera on it.
- The chair in the middle of the ritual has turned around. Interact with it to start the final cutscene and end the game.
Congratulations on completing Madison! The ending is certainly pretty cryptic, so we've put together a Madison ending explained guide to help consider the consequences of what happens to Luca in the final act.

