Pokemon Go tips and tricks to help you catch 'em all
Use these 16 essential Pokemon Go tips to be the best trainer around

These Pokemon go tips and tricks will help you a game that's been around for five years now. After all that time there's a lot of things trainers may or may not know about the popular mobile game. From how the game works to all the nuances in battle and catching, Pokemon Go may be deeper than most players realize. So whether you’re an experienced trainer who needs a refresher, or a newcomer looking to make the most out of their first few captures, these tips will help you in any situation.
1. Walk around to find what Pokemon are in the your area

This tip is mostly for newcomers, but if you’ve loaded up Pokemon Go for the first time you’ll need to know what’s around you and where to go. Pokemon will appear near you, but the real capture quest is when you start to walk.
Check out the “Nearby “ menu in the bottom right corner of your screen. This will give all trainers an idea of which species of Pokemon are nearby. The game will prioritize Pokemon that you haven’t caught yet - signified by a silhouette - but all other Pokemon shown are those that are closest to your location.
There will be nine snapshots of where to go and in most cases, they’ll have a PokeStop - more on that later - next to them to show where they are located. Tap on the footprints below the Pokemon and the game will zoom out to show you where to find that PokeStop and Pokemon. This is also where you’ll find all the Pokemon Raids taking place in your surrounding area but we’ll get onto more on them in a bit.
2. Spin all the Pokestops for Poke Balls, loot and resources

The floaty blue bricks you can hopefully see spread out around the map are known as Pokestops. They tend to be local landmarks like churches and tourist spots and initially came from Niantic’s previous game Ingress. Since launch, these have evolved and you can even apply to get Pokestops authorised. No, asking for your house to be added doesn’t work… We’ve tried. When you get into range of a Pokestop, you'll get a bit of info on it, a nice picture and, most importantly, a little loot drop of new items. These will include a selection of much needed Poke Balls, revives, potions, and other special items. As you progress through levels, these rewards will vary more as you unlock better potions and revives. Research tasks will also drop from Pokestops and you’ll even get gifts to send to those on your friends list as a nice postcard reminder of your travels. Or, y’know, your walk to work.
3. You don't have to actually touch a Pokemon to catch it

You don’t need to go right up to a Pokemon to catch it. If it has appeared on your map in cartoon form then you just need to touch it with your finger and you’ll enter the catching screen for Pokeball flicking. This means you don't need to go into a stranger's garden/car/personal space to retrieve a Pikachu. Phew. Check out the rest of our Pokemon Go myths busted.
4. Lures can help you and others catch more Pokemon

If you can see pink petals falling around a Pokestop, that means someone has attached a lure. You’ll earn them as you progress through levels and they’re available for purchase in the Shop. Lures mean Pokemon will be attracted to the area and it’s active for 30 minutes. The benefits can be used by all trainers so be a good human and activate them at a stop you think the most people could make the most of it. You can even see the name of the trainer who donated the lure so you can try and thank them in person. Look out for community days where lures will last for three hours or even longer.
5. Incense is like a Lure, but just for you

The incense item is exceptionally useful if you want to bring in the most wild Pokemon right to your spot. Unlike the lure which can be shared, incense means you'll produce a purple cloud for half an hour that will draw Pokemon just to you. This is really helpful if you are perhaps in an area with Pokemon you don’t normally catch. In recent years, Niantic allowed for Incense to allow Pokemon to appear where trainers are more frequently even while idle. However, with areas opening up more and more, the company has reverted to how Incense worked before. Trainers will still get Pokemon at their location but they are much less frequent. The effectiveness of these items are best when walking around. Trainers can also pop a Lucky Egg to double the amount of experience gained catching Pokemon, spinning PokeStops and more. Use the Lucky Egg and Incense at the same time to gain a lot of experience points in a short amount of time.
Pokemon Go Eevee evolutions | Pokemon Go Great League best team | Pokemon Go Master League best team | Pokemon Go Ultra League best team | Pokemon Go Giovanni counters | Pokemon Go Cliff counters | Pokemon Go Sierra counters | Pokemon Go Arlo counters | Pokemon Go Ditto | Pokemon Go evolution items | Pokemon Go 41-50 level guide | Pokemon Go Unova Stones | Pokemon Go A Thousand-Year Slumber | Pokemon Go shiny list | Pokemon Go XL Candy | Pokemon Go Mega Energy
6. Always have an egg incubating while you walk

One of the many rewards from Pokestops include eggs. These come in five standard varieties; 2km, 5km, 7km, 10km and 12km. The 2, 5 and 10km eggs are obtained via spinning PokeStops. The 7km eggs are obtained only via gifts from friends while the 12km eggs are obtained by beating a Team Go Rocket boss. You have one infinite incubator in your item bag so always make sure you are using that as you go for walks. You’ll find your eggs by swiping right from your Pokemon collection screen. More incubators come in two different flavours. Standard and Super. Super Incubators will reduce the distance necessary to walk but are more expensive to buy in the shop. Regardless of which type they are, other incubators sadly can only be used three times before they break so make sure to put lower distance eggs in your infinite incubator and save higher distances for breakable ones. Good old maths.
7. Delete stuff in your bag to make space

Keep up with your items. You have a limited number of item spaces and this fills up remarkably quickly if you’re hitting a lot of Pokestops. Want to use up some bits? Try dishing out those Razz Berries to hard to catch Pokemon or change your moves with Charged TMs or Fast TMs. If you get sick of spinning the icons on Pokestops and being told your bag is full, you can upgrade your item space by spending some very real money on Pokecoins. You can also delete items in your pack by hitting the trash can and then selecting how many of those items you'd like to drop to give yourself more room for Pokeballs. Keep in mind that you probably don’t need as many regular potions when you have super and hyper potions, or revives when you have plenty of max revives, and you’ll keep on top of your space without much extra investment.
8. Walk with a buddy Pokemon to earn candy

Where would Ash Ketchum be without his Pikachu? Bonds between trainer and Pokemon are not only cute, but beneficial. Head to your trainer profile and select the "Buddy" option from the menu. Here, you can select any Pokemon you've caught as your new walking partner.
Walking with a buddy earns candy for its species, so it's particularly helpful to pick something rare in your area that you want to evolve. Dying for a Charizard but only caught one Charmander? Set him as your buddy and earn Charmander candy just for going on a stroll.
Different species of Pokemon require different distances before you'll earn a candy for your trouble, so consult our chart of Pokemon Go buddy walking distances to help you make your pick.
9. Leave Pokemon in gyms to earn coins

If you see a Gym of your team with an open space for a Pokemon defender, it's worth dropping one of your highest level Pokemon in there to defend it for a while. Not only will you help boost that Gym's ranks, your Pokemon will actually earn you Pikachu coins for the duration of its time there, which you can then spend on lovely things like Incubators and bag upgrades. Sweet!
Gyms tend to be train stations or other big landmarks and you’ll see them proudly displaying Pokemon team colours. Yellow for Instinct, red for Valour, and blue for Mystic. Each gym has a Pokestop at the top and up to six Pokemon inside. If you have arrived at a rival team’s gym, you can jump in and battle, or train if you are at a friendly gym. Gyms run on what’s called ‘Motivation.’ Every time you fight a Pokemon, its motivation drops. Drop the motivation of every Pokemon in the gym to 0 and you’ll win the gym. It might sound easy but it takes serious time to chip away at if you’re alone and the gym is full of powerful Pokemon.
To save things being unfair though, you can’t have more than one of each type of Pokemon so you won’t find 6 Tyranitar to make your way through. If you pass a friendly gym and there’s a spare slot, you can leave your Pokemon to fight for your team. Bear in mind though that they’ll be there for the duration. You do get paid though. For every 10 minutes held you’ll earn one coin, up to a maximum of 50 coins a day.
10. Master these combat tips to fight in gyms

To fight a Pokemon at the gym, you don't have the same set up as the standard game. When you arrive in the arena you only have two move types - Fast and Charged. In order to perform your basic, Fast attack all your need to do is tap away on your Pokemon. Fill up the meter that you can see under your health bar and you can send out your special, Charged attack by holding your finger on the meter. You'll also need to dodge incoming attacks too, which is just a matter of swiping left and right on the screen.
If you’re looking to have a PVP battle or a battle against Team Go Rocket, your Pokemon will still have their Fast and Charged attacks and they function the same way. The difference is that Charged attacks will take a small minigame where trainers usually have to swipe the screen to capture all the elemental symbols that appear on screen to fill up their gauge. The more the gauge is filled, the stronger the attack.
PVP battles also have Shields. Each side has two shields to block a Charged attack but once they are gone your Pokemon will be open for attack. Choose wisely!
11. Level up and evolve your Pokemon

If you want to fight at gyms you're going to have to level up your Pokemon, so that means increasing their CP stat. You can do this in the power up section when you are looking at your individual monsters - a combination of Stardust and Candy will do the trick. You can get Candy when you send back that specific Pokemon to Professor Willow so keep an eye out for that specific Pokemon and keep sending them back to earn more. It's big numbers of Candy that'll let you evolve too.
When you evolve your Pokemon, you want them to be as high a CP as possible in order to evolve into an even more powerful beast. If you want to get into the nitty gritty of exactly how much you can level up, trainers can check out their Pokemon’s IVs and stats by pressing the ‘Appraisal’ feature in the Pokemon’s detail screen. Your team leader will appear to show off your Pokemon’s Health, Defense and Attack stat.
12. Complete Professor Oak's Quests and earn important items

If you're one of those lapsed Pokemon Go players, you'll be pleased to hear that there's a lot more structure nowadays in how to play the game. Professor Oak has invaded Pokemon Go and is delivering a stack of challenges that give you a focus for playing. There are two types of challenges available in-game. The first are Field Research quests, which you pick up from Pokestops. They include tasks like winning a certain number of Gym Battles, taking part in a Raid or catching a certain number of a specific type of Pokemon. If you complete seven of these, you'll earn yourself a special Pokemon, which always comes equipped with a move that it can't usually learn.
The second type are Special Quests. These are pre-set by the Poke Professor himself, have multiple objectives to complete but have great rewards for completing them.
13. Check in daily to make the most of rewards

Another reason to come back to Pokemon Go regularly is the fact that there are now daily bonuses. Spinning a Pokestop and catching a Pokemon just once per day actually gets you some good rewards, and if you do it every day for a week, there are some even juicier treats to be had.
14. Add friends to send and receive gifts
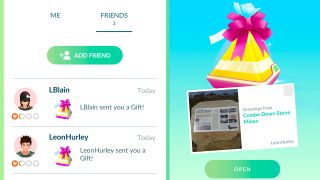
The Friends tab in your trainer menu lets you add friends. You'll see your 12-digit friend code there, and to add anyone you'll need theirs or to share your own.
Once you're friends though, you can send each other presents containing useful items like potions and Pokeballs on a daily basis. And what's more, you just pick up the presents at Pokestops and can exchange them for free.
15. Pokemon Go Trading lets you swap Pokemon with friends

Part of this new friend system for Pokemon Go includes the option to actually trade Pokemon with your friends. In order to initiate Pokemon Go trading you'll need to fulfil the following requirements:
1) Be Pokémon Go Friends with the person you want to trade with
2) Have a Trainer Level of 10 or above
3) Be basically next to the person you want to trade with in real life, aka within 100m
Other than that, you need to take into consideration that it costs Stardust to trade Pokemon, and a Pokemon's HP and CP will change when it's traded. You can view what the changes will be before you trade, but it's worth checking because you could get a high-level Pokemon seriously changing if you're trading with a player of a much lower level. You can't trade mythical Pokemon like Mew though, and anything of a shiny or Legendary variety will be much more expensive and can only be traded once per day.
16. Raids are an excellent way to get rarer Pokemon

Pokemon Go raids are another daily occurrence in Pokemon Go nowadays, and if you want to get some of the rarer Pokemon, and some of their evolutions, this is a great way to do it. They appear atop Gyms, and the game will tell you what's appeared and where. You'll need a Raid Pass (you can use and collect one per day), but after that it's just a case of wandering over to the relevant Gym as and when the Raid is live.
It's worth noting though, that these are tricky. You'll want to gather some friends to battle with you, or make sure there are other trainers also joining you for the fight when you get there. The difficulty level is marked in masks under the Raid, and while it's possible to take down a level one or two solo, you're going to have to enlist some fellow trainers for anything tougher than that.
Sign up to the GamesRadar+ Newsletter
Weekly digests, tales from the communities you love, and more
Louise Blain is a journalist and broadcaster specialising in gaming, technology, and entertainment. She is the presenter of BBC Radio 3’s monthly Sound of Gaming show and has a weekly consumer tech slot on BBC Radio Scotland. She can also be found on BBC Radio 4, BBC Five Live, Netflix UK's YouTube Channel, and on The Evolution of Horror podcast. As well as her work on GamesRadar, Louise writes for NME, T3, and TechRadar. When she’s not working, you can probably find her watching horror movies or playing an Assassin’s Creed game and getting distracted by Photo Mode.
